
Friday, 29 October 2010
Wednesday, 27 October 2010
Centaur Nears Completion
Here's a new set of pictures of the completion of the centaur body!
As I posted last time, I'd resolved to make a new body out of foam. The first time around I didn't have quite enough foam, so I thickened it with alternating slices of a thinner sheet of foam I used to pad the harness.
The problem was that the surface along the torso was all irregular, and carving wasn't very easy with the different foam densities. I'd made a whole new skeleton, so why not make a whole new foam torso?

As before, I stacked the foam segments on the spine, but this time I glue-gunned them into place.

Next I carved the out the legs. I used the skeleton as a template to make sure they were the right size, then started rounding them out from there using a carving knife. The carving knife was a great tool, although the foam blunts it after a couple of minutes' cutting, so I kept a sharpener handy.

The next step was to insert the skeleton. Following some advice on a puppetry blog, I made slits, then plucked out a tube-like chamber, wide enough to house the plastic leg bones.

Then, reattaching the hip bolts, we get the assembled rear legs.

A few more screws to reattach the hips to the aluminum spine.

To carve the torso, I kept a small plastic toy horse at hand (maybe you can spot him in the background). Nevertheless, I made two errors - one, not starting out with enough foam to make the round stomach, and secondly, I made the whole thing too long. I hadn't accounted for the length of the ass - the haunches protrude well beyond the foam skeleton.

Overall the net effect, particularly striking once Morgan was suited up it it, was a ridiculously long horse body, making Morgan look minuscule compared to the school bus sized body she was dragging around. At this point, though, I had no objectivity and couldn't really see it, but my wife Danielle was pretty insistent it looked silly.

A couple of inches off the spine, and it looked much better. The next thing to do was to turn it upside-down, and hot-glue on a thick slab to be carved into the stomach. This was really tricky as it was hard to plane the undersurface into something flat enough to glue onto - hot melt isn't very strong, so the final form involves two duct-tape 'belts' for strength.
Then I carved out two channels in which to mount the leg-string guides.
 A quick test with Morgan. You can see in this picture that I've carved away the fronts of the thighs. I had planned to do this all along and mount them with bead-filled bags. After getting a shape I was happy with, I was very reluctant to do this step, but it was necessary as the foam was far too rigid for Morgan to be able to bend it - all the leg action was constrained to the lower joint. In the end, though, exhaustion set in and I never did fill the missing space with anything.
Next step, the skin. I haven't sewn in 23 years, not since grade 8 home economics. I was a little scared, then more gravely worried when the sewing machine started spewing out little spider-like knots of thread. But with some expert guidance (I had threaded the machine incorrectly, throwing the thread tension way off), I was on my way.
First step, some pants for Morgan. I was sewing heavy spandex, so my pattern could be dead simple; I didn't even bring the leg segments to a point to come together in the crotch, but fortunately the material is stretchy enough to accommodate despite this.
I had experimented to see how stretchy it was - about 180% stretch on one axis, maybe 130% on the other, and left what I thought would be enough room for the pelvis padding I'd carved (not shown) to make Morgan's hips look more like the chest and shoulders of a horse. But I underestimated how tight that would feel - much bunching and itching and butt crack sticking out, and so the fake muscles are on the shelf for now, seeing if I have time to make some brown, looser overshorts to hold them.
 Errrrrmum-mum-mum-mum-mum-mum-mum.
Next step, remedial drapery. I wanted the skin on the horse to be tight, so following some advice from mum I just draped the fabric over it, and cut out likely-looking pieces, pinned them, then did some more.

This worked out very well, although I'd choose completely different seam placement were I to do this again. Morgan's dress will drape over the torso; the key area to make smooth is the rump. One seam up the middle, and darts wherever else necessary.

The inner thighs were the hardest part. A washable marker was my friend here (chalk pencils barely work on spandex) to label which pieces need to be sewn together. When it's off the foam body, the skin is just a floppy confusing mass of shiny fabric, it can be surprisingly hard to keep straight what needs to be sewn to what.

A marathon stretch at the sewing machine (about 6 hours) and the legs and body was finally done.
This step made me laugh - trying to 'dress' something this large was like trying to dress a sleeping person. It felt like it needed a name at this point! Some sports socks were very helpful in smoothing the passage over the very grippy foam, but the hips were a major pain.

Ta da! This is the horse with a temporary tail - we've got some blonde wigs we're going to use instead. Sorry for the visual clutter in this shot, my living/dining room was buried in bits of foam and tools, there was hardly anywhere to move.

Tuesday, 24 August 2010
Walking Test #1
Here's a short video of a walking test. It's very wobbly at the beginning, but the end is better. We'll see how it works once I get some rubber treads on it.
Monday, 23 August 2010
Centaur Details
This weekend I took the plunge and rebuilt the centaur skeleton. I mulled this over for quite a while, but after talking some options over with a friend, this seemed the best way to proceed.
Here's the Mark I centaur skeleton - padded aluminum harness, with everything else made of 3/4" plastic pipe. The body shape was made from layers of foam, shaved down with scissors.

If the shape looks too skinny at the back, that's because the thighs go on later.
 In this version, the legs (only half of the legs are shown here) are passively moved - like a marionette, except from below. The legs would dangle from the centaur hips, while the hoof would be fixed to a ski-like slat attached to Morgan's ankle by a sort of padded manacle.
The first walking tests with the ski-legs were successful, but were unsatisfying on two counts. One, they're uncomfortable. Morgan's well aware the final result might be hot, itchy and confining, but my experience with the spider legs last year taught me that skis can be trouble in an urban environment - particularly curbs.
The second problem is, well.. horses don't walk like a marching band, with left and right legs in synch. The illusion of horsiness would be much more convincing if Morgan's right leg controlled the horse's left, and vice versa. I thought I could pull this off with one arched ski and one flat ski, but I was having second thoughts.
Spring-Loaded Legs
Taking an idea from the Walking with Dinosaur 'making of' videos, I had been mulling over the idea of using bungee to create artificial tendons. The tendons would keep the legs tense, and Morgan could pull them out of position using strings. String goes around corners nicely, so I route them near the body of the horse! The lack of skis would certainly also improve the illusion.
But the first problem with this is that the good old Mark I centaur's hips just aren't that strong. The spine and hips were connected by a single stove bolt, and I was worried the joint might give on Hallowe'en night. Deep inside the costume, there would be no possibility of repair - a sad end to Trick or Treating!
Artificial Muscles
I mentioned the missing thighs before - my plan is to make them out of spandex bags, filled with polystyrene beads. Just like real flesh, these would squish out to the sides when compressed, rather than just contracting like foam.

I sew like a five year-old at the best of times, and sewing Spandex truly sucks. It bunches, it twists, and it's flexible enough for the needle to stuff it deep inside the sewing machine whenever I reverse to close off a seam. Nevertheless, I was able to get the job done, albeit messily, and dipped into a second-hand bean bag chair for the fill.
 Adding grommets to the corners, here's my finished thigh muscle prototype!
A Lifetime on the Hips
In fact, if I was going to replace the plastic hips, why not replace the whole spine? Days of work came apart distressingly quickly, and soon I was on my way. Here's the new lumbar (the child end of the horse's spine, where it attaches to the harness).

It just looks durable, doesn't it?
 Old hips:
New hips:

Another improvement to the new hips is that the hip bolts themselves will now pass through two pieces of metal, instead of just one - this will keep the bolt much straighter, and allow a lot less wobble as the legs are worked.
Spring Loaded Legs
This part was slow. I was well aware that my sketch had a lot of missing details. There's process I've been through several times on this project, it goes like this.
- Imagine cool, ultra-realistic motion effect (e.g. the walking motion of the back leg of a horse)
- Come up with simple mechanism to achieve this effect (e.g. spring-loaded leg, with a string to lift it! Hurrah!)
- Build it
- Reality sets in. (e.g. A horse walk cycle has about eight phases to it, and that my one string can't possibly pull it off.)
Here are the legs, attached to the pelvis. I reused the plastic pipe for the upper (thigh) and lower (foot) sections, and used a piece of flat aluminum for the horizontal shin. (By the way, horse's knees don't bend backwards - the knee is much higher up and nearly obscured by the massive, disc-like thigh, and what appears to be the knee is actually the ankle. Horses literally walk on tip-toe.)
The shin extends a little beyond the plastic pipes to provide leverage for the bungee. Here's a close-up of the inside of the right knee:

This close-up also shows the main weakness of the joints, the bolts themselves. I'm using a threaded stove bolt as the hinge, but the back-and-forth action of working the joint tends to unscrew the nut. I don't want to put a washer on and make it super-tight, because that would interfere with the smoothness of the joint. The carriage (smooth) bolts I've seen are too large. My makeshift solution so far has been to crazy glue the nut in place, but this makes it hard to maintain.
I intend to revisit this later. Something I'm thinking of doing is making my own hinges by cutting lengths of aluminum rod, and then drilling holes into them to put r-clips through on each side of the leg bones.
When it was all assembled, I had a pair of rear horse legs, spring-loaded in the fully-extended-to-the-rear position. I've also added two new aluminum pieces to the hips, to build out the pelvis. Those holes near the front are to attach muscle, creating the front of the thigh between the pelvis and the knee.
 Here's Morgan, wearing the nearly completed skeleton!
If you squint, you can see the strings tied to her knees. The hooves are made from a 3" PVC connector, hacksawed in half diagonally. (Tedious, but simple.)

The Walking Test
In the three walking tests to date, it's occasionally so awesome that onlookers squeal with delight, and sometimes it's so abysmal I get worried the costume will destroy itself. The problems:
- Humans swing their hips when they walk, but this causes the horse body to flail from side to side; Morgan has had to learn to walk like her hips were the front axle of a wagon.
- The aluminum straps of the harness dig into Morgan's chest.
- The harness isn't quite symmetrical (I suck at bending aluminum bars), so the horse has a slight tilt to one side.
- On smooth surfaces (e.g. our laminate floors) the hooves slide around a lot. I think I can solve this by weighting the rear hooves and adding rubber grips to the bottom. I hope that will perform nicely on concrete and grass.
Thursday, 19 August 2010
The Danger of Mediocrity
 Hypothesis: Offend enough people and you're in trouble - but if you're really offensive, just describing what you've done violates too many taboos for you to get famous.
Wednesday, 18 August 2010
Centaur - Pictures Soon!
As a way of practicing for the larger dinosaur costume, I've been making a centaur costume for Morgan, my six-year old. So far I've mostly completed the skeleton, which is made of 3/4" plastic pipe, screwed together, and the core of the horse torso, which is made from a carved stack of sofa cushion foam.
Sunday I spent most of the day at the picnic table turned workbench, working on various ways to attach the costume to Morgan. I've tried to prepare her by telling her since the beginning that it might be uncomfortable, but I couldn't find a satisfactory arrangement of straps that didn't either strangle her, or affix the horse torso too loosely to her.
In the end, I've opted for thick aluminum straps which travel up her back and then bend over her shoulders in a rigid frame. This is a nice setup since there's nothing to fasten; she just wriggles in and she's good to go. (One surprise for me was that, because of kids' proportions, it took me a few tries to build something tight enough to sit properly on her shoulders, but which she could still get her head through!
Aluminum Bars!
My surprise discovery is how nice it is to work with aluminum bars. The 1/8" x 3/4" flat bars are both strong and light. Self-drilling screws go through it like butter, it's easy to saw (with a hack saw), and it's flexible enough that with the right corner, I've been able to hammer or bend it into crude curves in a pinch.
The major downside is the cost. A 4' aluminum flat rod costs over $10 at Home Depot. I'm eyeing onlinemetals.com, which is MUCH cheaper ($2 for a 4' length) and seems to ship to Canada.. for around $0.08/inch.
Thursday, 5 August 2010

Tuesday, 3 August 2010
Making Of Dinosaurs
If you have $20 million dollars, here's how you'd go about making dinosaur costumes.
Friday, 30 July 2010
A Tale of Two Dinosaurs
As soon as I saw this video (below), I knew what I was going to try to do for Hallowe'en.
These are two of the smaller, one-person dinosaurs from the live-action Walking with Dinosaurs show. That reportedly had a R&D budget of $20 million, so there's no way I'm going to come up with anything as good as this.
What I'd really like to hit is the puppetry of them, which is masterful. To explain what I mean, compare with this video:
In some ways, this second dinosaur is better - the actor's legs and ass aren't hanging out, for one thing. But the movement is so unnatural that it's almost comical. The actor's hips cause the dinosaur's legs to bend mid-thigh, causing an unsightly wrinkle of rubber. The head and neck are so stiff they make batman look agile. The whole thing screams man in rubber suit.
But How?
The 'making of' videos are informative - actually jaw-dropping. From what I can tell, these suits are built as follows:
Neckosaurus
I'm not worried about the legs - they're gorgeous pieces of art, but the basic principle is the same as the spider's legs. But the neck..
The head of this creature makes up so much of its personality. If you watch the video carefully, you can see there's tremendous range of motion - the neck can stick straight forward, be nearly right-angles to the body. The head can turn side to side, look up and down, and can even cock to one side like a curious dog.
All of this is amazing when you consider that all of this is happening well out of the actor's reach. What does the head control mechanism look like?
I'd designed something on a scratch pad, but I realized it wouldn't be nearly expressive enough. This is my current thinking:
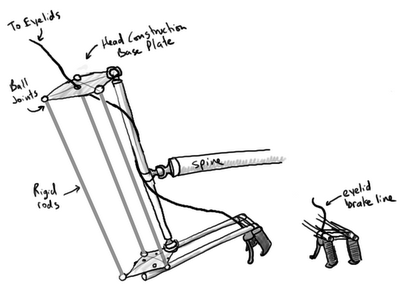
The upper, diamond-shaped plate is in the head of the monster, and is the platform for building out the skull. Below, there's an identical plate. The two plates' orientations are locked together by a series of rigid rods, affixed with ball- or universal joints. This creates a sort of 'voodoo' mechanism - rotating the lower plate causes an identical rotation in the upper plate.
But.. I've never built anything like this mechanism. Looks to me like there would be tremendous stress on the spine-neck connection. Also, where do I get little ball joints like that? Can I solder copper pipes together, or would the solder just crack apart the first time I bark at an impudent kindergarten Spiderman?
These are two of the smaller, one-person dinosaurs from the live-action Walking with Dinosaurs show. That reportedly had a R&D budget of $20 million, so there's no way I'm going to come up with anything as good as this.
What I'd really like to hit is the puppetry of them, which is masterful. To explain what I mean, compare with this video:
In some ways, this second dinosaur is better - the actor's legs and ass aren't hanging out, for one thing. But the movement is so unnatural that it's almost comical. The actor's hips cause the dinosaur's legs to bend mid-thigh, causing an unsightly wrinkle of rubber. The head and neck are so stiff they make batman look agile. The whole thing screams man in rubber suit.
But How?
The 'making of' videos are informative - actually jaw-dropping. From what I can tell, these suits are built as follows:
- There's a full-length structural skeleton, supported by a backpack-like harness worn by the actor.
- The skeleton is supplemented by a few rigid sections, like the ribcage and skull.
- The tail is segmented, made from concentric cross-sections of sturdy foam.
- The skeleton is augmented with "muscles". As with so-called 'fat suits', these are overlapping, muscle-shaped bags filled with polystyrene foam beads. As the skeleton moves, these muscles squash and bulge the way solid tissue would, preventing the skin from folding unnaturally.
- A highly textured skin is attached, in sections, and fastened on with Velcro.
Neckosaurus
I'm not worried about the legs - they're gorgeous pieces of art, but the basic principle is the same as the spider's legs. But the neck..
The head of this creature makes up so much of its personality. If you watch the video carefully, you can see there's tremendous range of motion - the neck can stick straight forward, be nearly right-angles to the body. The head can turn side to side, look up and down, and can even cock to one side like a curious dog.
All of this is amazing when you consider that all of this is happening well out of the actor's reach. What does the head control mechanism look like?
I'd designed something on a scratch pad, but I realized it wouldn't be nearly expressive enough. This is my current thinking:

The upper, diamond-shaped plate is in the head of the monster, and is the platform for building out the skull. Below, there's an identical plate. The two plates' orientations are locked together by a series of rigid rods, affixed with ball- or universal joints. This creates a sort of 'voodoo' mechanism - rotating the lower plate causes an identical rotation in the upper plate.
But.. I've never built anything like this mechanism. Looks to me like there would be tremendous stress on the spine-neck connection. Also, where do I get little ball joints like that? Can I solder copper pipes together, or would the solder just crack apart the first time I bark at an impudent kindergarten Spiderman?
Thursday, 29 July 2010
No Mad Rush
Well, at the risk of eating my words, I'm starting my very ambitious Hallowe'en costume early this year - very early. Last time it was a mad rush, so intense that in the last week I had to resort to an quick 'n' dirty project plan complete with time estimates, the cutting of low priority items, etc.
But this year, it's going to be smooth sailing. No all nighters for me, oh no. Nope. So I figured I'd start early.. like.. July. That gives me three months! What could go wrong?
But this year, it's going to be smooth sailing. No all nighters for me, oh no. Nope. So I figured I'd start early.. like.. July. That gives me three months! What could go wrong?
Tuesday, 13 July 2010
The Value of Iteration
I stumbled on a simple thought experiment that nicely illustrates the value of iteration.
Imagine a well-intentioned but flawed device, perhaps a homely little robot, trying to navigate its way on a nighttime trip to the gas station for a midnight snack.

To do this, it navigates using the stars. Whenever it sets out, it takes a photo with its upwards-pointing telescopic web cam, then compares the result with an internal clock and a star map. Using this, it deduces where it is, and which direction it ought to speed off in.
Unfortunately, the web cam takes only grainy photographs. Not only this, sometimes the stars are partly occluded by overhanging trees, a plane inches across the frame, or the robot is totally unlucky and captures a street light.
As a result, half the time it draws the wrong conclusion entirely about which direction it should travel, and heads off in a completely random direction. It only picks the right direction of travel half the time.
With this level of accuracy, our robot's journey is fraught with danger. There's only a fifty percent chance it will reach its destination at all, and even if it makes it, it faces the same risk on the way back. The odds of a successful round trip are only one in four.
Iterate!
Accordingly, we make one tweak to the robot - instead of checking its starmap only at the beginning of each leg of the journey, it checks repeatedly, perhaps every five minutes. This is done in the crudest possible way: by jumping to the top of its simple little navigation program.
This one tweak has an amazing effect on its accuracy. Even though it has no memory, no ability to decide stay on course if it takes a bad photo, the robot's arrival is now a practical certainty.
Why is this?
Assuming the time between checks is small compared to the length of the journey, the refined robot will spend an average of half the time driving towards its target. The rest of the time will be spent travelling in a random direction.
Importantly, these random, off-target jaunts aren't all in the same wrong direction - they form a random walk.
Inevitable
Some of the time, the robot will be travelling in exactly the wrong direction, cancelling out whatever progress it has already made.
That will happen only rarely, however. Most of the time it will be off-target by a lesser degree. Even when it's headed almost directly away from its target, it will still be increasing the distance to its target at less than its full drive speed - a problem which is more than compensated for by the half of the time it does drive the right way. On average, it will simply be wasting time, heading perpendicular to the direction it should be.
Overall, the tweaked robot will make an average rate of progress of half its best speed, jigging and jogging this way and that, but heading inevitably towards the gas station. And they said that GOTO was considered harmful.
Thursday, 10 June 2010
Command-lines in games
Over at Emily Short's blog, she has an interesting post on whether interactive fiction games really need parsers.
One of the things that makes command-lines powerful in computer interfaces is the ability to chain together commands in novel ways (e.g. in Unix, listing files, and piping the results through a filter).
Guess-the-verb still exists (because nobody knows every possible command), but the user can (theoretically, at least) develop facility with all of them independently – anything can be filtered. There aren’t any special cases where the commands suddenly behave differently. All of the possible outcomes emerge naturally from combinations of commands.
The game-world analogue for this is a physical simulation – given a number of universally available options (walking, lifting things, letting things go, throwing things), and all outcomes emerge from combinations of these, in the context of the universal world rules (e.g. mass, gravity, the rigidity of objects, friction).
A given puzzle (e.g. press a button high up on a wall) might have many solutions – stack some boxes, throw a ball at it, etc., and perhaps only one or two of them were anticipated by the scenario author.
Once you get to a certain level of facility (e.g. you’re no longer trying to pick up the air, or ‘throw’ when you’re not holding anything), every sequence of actions does at least have an outcome. (Though you might not like it!)
In CDLIB (MUD software – I’m not sure how this compares with Inform), the situation is quite different.
While there are global verbs, like ‘north’ – many verbs are made available to the player by relevant objects. I can’t ‘smoke’ anything except a cigarette – I can’t ‘smoke twig’. (Unless I’m carrying a cigarette, in which case I might be told ‘You can’t smoke that.’) I can load my sling with pebbles, but not a stick of chalk.
Successful smoking and sling-loading are special cases, outcomes that were pre-planned. Many attempts to invoke these concepts result in no outcome at all.
Pocket interactive fiction occupies a very awkward position, to my mind. Immersion requires the promise that you could do anything, but specifying the flammability of every object in the game world is a crazy investment when all you want to do is let the player enjoy a post-coital toke in scene six.
One complicating factor is that a lot of the actions we wish to support in IF are very high-level. Smoking consists of numerous small actions (open packet, get cigarette from packet, put cigarette in lips (not mouth!), get match from matchbox, rub match on matchbox, touch cigarette with match, shake match).
Another complicating factor is the highly idiomatic nature of language – it only makes sense to ‘smoke’ a handful of things, but it’s immersion-breaking if we simplified and forced users to type ‘consume cigarette’.
So we resort to writing special cases needed to make the game go… but then we’re left repairing the immersion by writing endless witty no-outcome responses to unsupported actions like ‘smoke chalk’.
Thursday, 3 June 2010
Three Year-Old Magic
This morning at breakfast, my three year-old, Leah, performed an incomprehensible magic trick. She's holding her hands behind her back, waving them around, then she's shouting "Ta-Da"! I have no idea what was going on in her mind, but she seems pretty pleased.
"Honey, you need to explain what you're doing so people can understand your trick."
To demonstrate, I make a fist and hold it up. "There's a penny in my hand, and I'm going to make it disappear!" I hadn't anything in my jeans pockets, so I'm just pretending - my fist is empty. Maybe I'll get a laugh out of it.
Morgan, my six-year old, perks up.
"Show me the penny! There's no penny in there."
After years of my lame daddy-magic tricks with pennies, Morgan now questions every step of the way. There's no way she's going to believe there's a penny in there unless she sees it first.
"You're right, Morgan," I say, "there's no penny in my hand. See, Leah, people need to understand what you're doing and believe it, otherwise the trick doesn't work."
I'm not going to fool anyone, but now I'm in the mood so I continue with my impromptu routine.
"Look, Leah, I'll make it disappear!" I say, holding up my still unopened fist. "I'm going to squeeze it down to nothing!" Loosening my grip, I poke my finger in one side, then in the other, ostensibly pressing the penny down to dust-speck size.
"Now that it's too tiny to see, I'm going to blow it out like dust!" I hold my fist to my mouth, blow through it, then theatrically fan open my fingers, showing my empty hand.
"Where's the penny?" I ask.
Leah thinks for a second. She wasn't born yesterday. She's turning four in a week, she's been around the block a few times now. She's seen this sort of thing before.
"It's in your ear!" she exclaims!
Wednesday, 19 May 2010
Spring: Inject My Bean
A few weeks ago I was wondering how you get Spring to inject an existing bean that I'd instantiated myself.
I'm trying to integrate our JUnit concurrent test runner with Spring's SpringJUnit4ClassRunner, and while plumbing the depths of the relevant spring code, I came across this:
public void inject(ApplicationContext context, String beanName, Object bean, int autowiringMode) {
AutowireCapableBeanFactory factory = context.getAutowireCapableBeanFactory();
factory.autowireBeanProperties(bean, autowiringMode, false);
factory.initializeBean(bean, "bean name");
}
inject(bean, "myBean", appContext, AutowireCapableBeanFactory.AUTOWIRE_BY_NAME);
Simple!
Tuesday, 13 April 2010
Ill-Advised Hibernate Mapping Quandary
I'm wondering if this is possible:
class Idea {
Collection primaryTags;
Collection secondaryTags;
}
class Proposal {
Collection primaryTags;
Collection secondaryTags;
}
Mapped to:
CREATE TABLE (
IDEA_ID VARCHAR(36), /* Foreign key */
PROPOSAL_ID VARCHAR(36), /* Alternate key */
TAG VARCHAR(100), /* Whatever was in the String */
TAG_TYPE VARCHAR(9) /* 'PRIMARY' or 'SECONDARY' */
);
I'm thinking.. no. My problem is that I can't see a way to get Hibernate to take care of the TAG_TYPE column - a value that exists in the database, and must be inserted whenever new rows are inserted, but has a value specific to the domain collection whence it came.
Hibernate supports computed properties, but those exist on the domain side, and not in the database. I want the opposite! :-)
class Idea {
Collection
Collection
}
class Proposal {
Collection
Collection
}
Mapped to:
CREATE TABLE (
IDEA_ID VARCHAR(36), /* Foreign key */
PROPOSAL_ID VARCHAR(36), /* Alternate key */
TAG VARCHAR(100), /* Whatever was in the String */
TAG_TYPE VARCHAR(9) /* 'PRIMARY' or 'SECONDARY' */
);
I'm thinking.. no. My problem is that I can't see a way to get Hibernate to take care of the TAG_TYPE column - a value that exists in the database, and must be inserted whenever new rows are inserted, but has a value specific to the domain collection whence it came.
Hibernate supports computed properties, but those exist on the domain side, and not in the database. I want the opposite! :-)
Monday, 12 April 2010
This blog has moved
This blog is now located at http://blog.trilemma.com/.
You will be automatically redirected in 30 seconds, or you may click here.
For feed subscribers, please update your feed subscriptions to
http://blog.trilemma.com/feeds/posts/default.
Subscribe to:
Posts (Atom)