Thursday 30 July 2015

Night's Black Agents - House Rules

Tonight we concluded our Night's Black Agents campaign.  We finally figured out to consistently do damage in the combat system.  MP5 with a tight burst to the head, a fat 12- or 13-point spend will do nicely. On a lucky roll you can even one-shot a vampire!

It's a good strategy, because vampires can cause so much chaos and damage you really don't want them surviving into round 3. Killing them in round 1 is ideal!


Tonight's climactic fight finale was two vampires and half a dozen Renfields, which looked like it could slide into a TPK at any minute, despite us coming extremely well prepared - thermobaric grenade to start things off, MP5 headshot, then supporting fire from an army surplus flamethrower.

(Flamethrowers are cheaty awesomeness in this game. Never leave your car without one.)

On the other hand, "Shock and Awe" tends to leave you with very few points to mop up the mooks, which turns the fight into unintentional comedy.  The mooks, too, start to run out of points, so the fight system almost does the opposite of what you want, steadily decreasing tension as everyone's attacks get less and less effective, like exhausted boxers circling one another but unable to land solid hits.

"I can't pick it up for 24 hours."
That and melee weapons (so far as we can tell) just suck compared to firearms.  You risk facing lethal damage from stand your ground when you close if your target still has a gun, and once you get there you need to have vast amount of points and pray for a critical - there's no special ammunition to boost damage, no laser sights to boost accuracy, no auto-fire for cheap extra hits.

Spending Preparedness to whip out a concussion grenade and throw it with Athletics is way more effective.

Upping the Ante

I propose three house rules to up the ante, and keep fights nail-biting until the final mook falls.

1. Unforgiven: By exposing yourself to enemy fire to take careful aim, disregarding the danger, you can spend Stability as Shooting.  You can sweat out your suicidal tendencies when you get back to your motel room.

2. Pulling a Muscle: By digging deep and straining your body to make a heroic effort, you can spend Health as Weapons, Hand-to-Hand or Athletics.

3. Multiple Stab Wounds: If you land a hit with a knife or dagger or other nasty, close-quarters weapon, you can treat it like a fully automatic weapon, but you spend Stability instead of Weapons on the extra damage dice. Stabbity stab stab, you psycho.

Tuesday 28 July 2015

Quick & Dirty AW-Style Character Art

One of Apocalypse World's iconic features is the stark, black and white character art in each playbook.

There are lots of ways to produce this sort of stuff, some requiring more talent than others, but here's is a relatively low-skill way to use Photoshop to producing vaguely similar-looking images.

(One of the things I like about it is that, with the exception of one step, it's all dynamic. I'm a big fan of adjustable, reversible steps that I can come back and tweak later. Running a series of filters and baking it all into a single layer just feels wrong to me.)

First, find a suitable original photo (which you have rights to, obv.). This is just a photo I snagged off the web, which means this man will presumably track me down and kill me at some point.


Chuck this into Photoshop, as the bottom layer.  Above it, add a Threshold Adjustment Layer, which will make the image look like this:


Tweak the threshold value (from 0-255) until you find a setting that you like.

One thing you'll notice is that (depending on your source photo), you may be looking at a lot of detail, with little 'crumbs' everywhere.  A simple way to chop this down is to make a copy of your photo (above the original) and then use the Gaussian Blur filter.

With the blur filter's preview feature turned on, you can see the effect it'll have on your image before you commit. (This is the one non-dynamic step in this process.)


Next, I chop out the unnecessary background with white. There's lots of ways to do this, but I like a Solid Color Adjustment Layer, using the alpha mask to control where it goes.  (I used the magnetic lasso selection tool to build the alpha mask, for the most part, but simply painting white or black on a layer above the source photo works fine too.)


Now, this is okay, but while a lot of the detail is good, his outline has been lost. To selectively control the threshold in parts of the picture, I use a paint layer to adjust it:

Underneath the white mask, insert a new layer, called 'Adjustment Paint'. Set it to 50% Opacity, and set the blend mode to Overlay. (Overlay can be used to both brighten and darken areas in the layers below.)

Painting black or white on this layer (I use a pressure-sensitive brush, but setting your brush opacity to 30% will do more or less the same thing if you're using a mouse.)

Paint black where you want more black in your final image, and white where you want more white. This lets you tweak parts of the picture to control, essentially letting you change the threshold value in specific areas of your image.

This is the adjustment paint layer over the original photo for illustrative purposes: I actually paint with the threshold filter on so I can see how it looks in real time. Yay adjustment layers!


As you can see, this adjustment layer can be really sloppy. As long as it's under the white mask, it's okay to paint into the background.

 I chose to darken his outline to make him look a bit more solid against the white; I darkened his gun but left his gloves and face fairly light.

This is the final image, about ten minutes' work in total:


Of course, you can do much more work - it still looks very photographic, and the sleeves in particular are all kinda crinkly. To take it further, you can hand-paint final details over the Threshold, using this approach as an 80/20 starting point.

Here, just for kicks, I've chosen a slightly lower threshold point to make it darker, adjust-painted the face back up, then put a black stroke around the white mask for a slightly more cartoon, cut-out look:


For reference, this is my final layer arrangement:


Monday 27 July 2015

House of the Tyrant

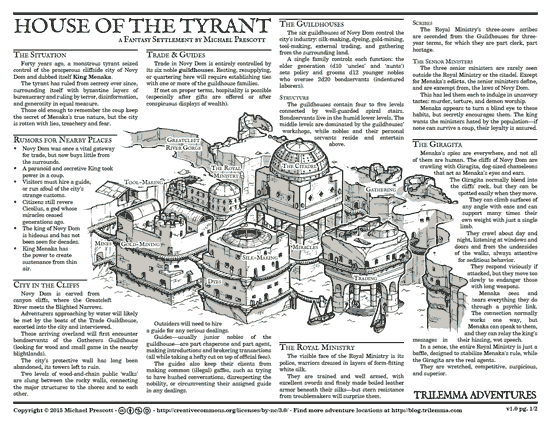
At long last, the next adventure is ready: House of the Tyrant!  Novy Dom is a bustling but isolationist city-state carved out of cliffs at the mouth of a river gorge.

The reason for their isolationism is their leader: a monstrous and paranoid tyrant that inserted itself by force, then set about protecting itself with layers of toxic bureaucracy.


Like the Unmended Way, I classify this as a settlement rather than a typical adventure. There is plenty of danger beneath the surface, but players can't murderhobo their way through it - that would provoke far too much resistance. They'll need to use diplomacy and circumspect cunning.

There's also plenty of gold here, but the real treasures are allies: if players can avoid getting into trouble long enough to make some friends, Novy Dom could be a safe (or safe-ish) harbor, a useful jump-off point. If they bungle it, Novy Dom becomes a costly tar pit, waiting to snare and exploit them whenever they return.

For this reason, House of the Tyrant works best in campaigns where travel logistics are an important part of the challenge - securing fresh provisions, expedition planning, guides, and so on. (Members of the Gatherers' Guildhouse would make excellent wilderness guides!)

On the Big Map, Novy Dom is situated in the north, on the coast of Blightlands. It stands at the mouth of the Greatcleft, a river system that would allow a boat expedition almost as far as the Firevault mountains. (Boating being an easy way to haul expedition supplies and loot, a lot easier than hoofing it over the Blightlands.)


For some reason, this map took me ages.  I showed it to my daughter last night and she said, "Neat! Wait.. are you still working on that one?" Sticky summer has arrived in force, and with it, moist paper curling in the humidity. (Thank goodness for waterproof ink.) A big thanks to my readers and patrons for their patience.

Though it took me a long time, the city of Novy Dom actually has roots older than that - it was a key location in my old "Grunweld" campaign.  In that game, King Menaka was a Burning Wheel-converted Beholder, who came to a sticky end at the point of Siggar's sword in his summer palace gardens.

Something I did differently this time was engage a copy editor - two, in fact!  Brent P. Newhall and Andrew Young were both good enough to help me beat my purple prose into something readable. Layout constraints being what they are, I wasn't able to take all of their suggestions, so any errors you spot are still all my own.  (Please let me know!)

As always, this content (the PDF, the text, the map) is free as in beer - use it, chop it up, remix it and rewrite it so long as it's non-commercial and you attribute the original.

Novy Dom Map (TIFF)