
Here's a typical, challenging object: a curved chute that drops from a trap door into a lower level.
This is a worthy attempt at a complicated shape, but as you can see it doesn't look quite right; it looks a bit twisted, like licorice.
The main problems seem to be two-fold:
1. How the $#*@! do you draw a nice curve?
2. How do you take that curved surface and extude it into a three-dimensional shape?
Drawing Isometric Circles
I've taken a stab at this before, but I've found a couple of ways that are a lot easier. Here's the basic structure, taken from this excellent blog post by Douglas Flynt:
That blog post spends a lot of time on subdividing the original square, but on isometric graph paper it's a lot easier. I'm drawing the outer curve of the chute, which has a radius of five squares:

Next step is to draw the inner curve, which has a radius of four squares:

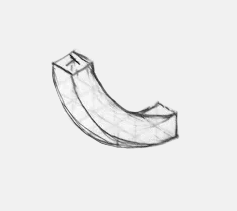
Erasing my construction lines, I'm left with this shape:

Extruding the Shape
Now I need to extrude this into a three-dimensional form. The trick to doing this is to draw exactly the same curves one square over:

With a bit of practice you can manage this freehand, until then, you may need to set up the curve-drawing framework you used for the original lines.
Once you've got this, follow the northwest-southeast axis to "tie" the two sets of curves together. In the lower left, you're drawing a tangent across the two sets of curves:

Then, trace the lines that will be visible to get the outline of the final form:

It's still a little bit wonky; as always I recommend doing all your construction work in pencil (or better yet, with blue pencil/marker so you can pull it out with Photoshop), so you have lots of tries at the freehand curves.
No comments:
Post a Comment